Manual
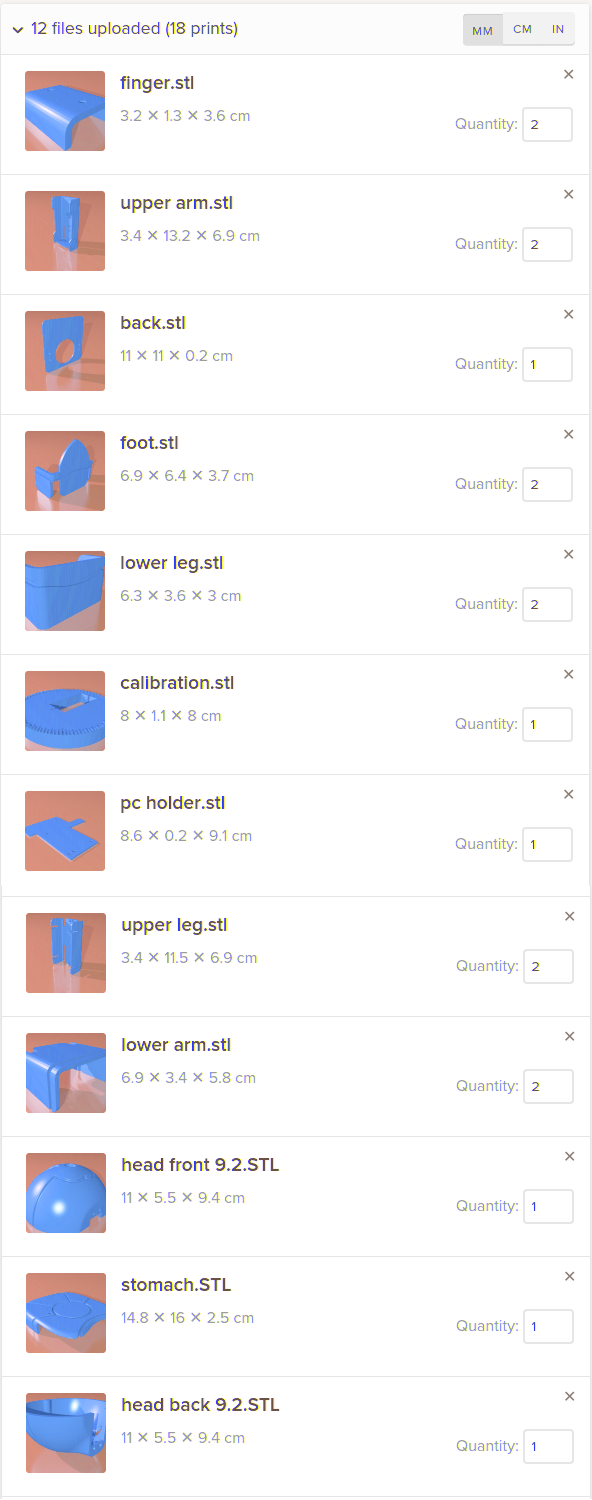
Print the following parts yourself on a 3D printer or get them from an external 3D print service (see links below).
The parts use the unit “mm”, usually you have to choose this to print or order parts. You can print in PLA or ABS and choose your favorit colour. The smaller the “µm” that you use for the print, the smoother the surface will be. For me “300µm” were ok, however if you get it smaller with a low price it will improve the look.
The parts have grooves where you can add 3mm (body) and 1.5mm (head) 3d-Print-Filament in another color. This way you get the 2-color look of the robot. When you order the parts, you can ask them to add the filament in another color to your order or buy the filament additionally yourself (e.g. on ebay or just google “3d filament 1.5mm”).
After you printed or received the parts you might need to take away the printing residuals. Then you can glue the 3mm and 1.5mm filament in the plastic parts. You can do this in the following steps:
- Cut the filament on the needed length for the part that you are working on.
- Apply glue into the groove that you are working on.
- Use a hair dryer to heaten up the filament. It will get flexible and can be formed.
- Place the filament into the groove.
3D Filament
| Per Part [cm] | For 2 parts (if needed) [cm] | Part name |
| 15 | 30 | foot |
| 13 | 26 | lower leg |
| 30 | 60 | upper leg |
| 91 | 91 | stomach |
| 56 | 112 | upper arm |
| 15 | 30 | lower arm |
| 51 | margin for shrinkage | |
| Overall: | 400 | cm 3mm Filament |
| Per Part [cm] | For 2 parts (if needed) [cm] | Part name |
| 82 | 82 | head |
| 18 | margin for shrinkage | |
| Overall: | 100 | cm 1.5mm Filament |
3D Parts
Links to order
Download:
Download all 3D parts in a zip file here:
Hallo Johannes
Ich habe festgestellt, dass die 3D-Teile zum Teil nicht so gut passen. War das bei Dir auch so, oder sind die Alu-Teile verschieden und ergeben so eine leicht andere Geometrie?
Z.B. die bei der Oberschenkelabdeckung stimmen die Aussparungen für die Schrauben auf der Vorderseite überhaupt nicht. Bei den Handabdeckungen stimmen die seitlichen Einfräsungen für die Schrauben nicht.
Wie hast Du gedacht, dass man die vier langen Abdeckungen befestigt? Auch mit Schrauben?
Danke und Gruss
Matthias
Hallo Matthias,
die Einzelteile müssten eigentlich an allen funktionalen Stellen gut passen. Am Besten einmal das erste Video unter “Videos” ansehen, um sicherzustellen, dass sie genau an der richtigen Stelle sitzen.
Die Unterschenkel mit je 1 Schrauben von Vorne.
Die Knie mit je 2 Schrauben an der Seite
Die Oberschenkel glaube mit je 1 Schraube ganz oben.
Die Finger und Unterarme mit je 1 Schraube von oben (also von der Seite des Roboters).
Die Oberarme glaube ich auch mit 1 Schraube oben.
Im Video kann man die Meisten der Schrauben sehen.
Viele Grüße!
Johannes